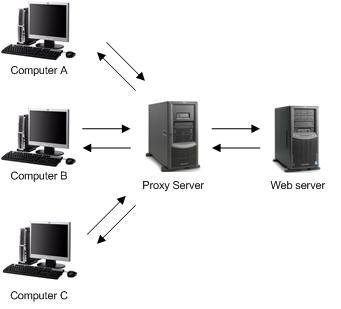
今回、構築するプロキシサーバーは、クライアント側で利用するプロキシです。主にブラウザーに設定して利用します。一般的に「串」と呼ばれているもので、パスワード認証付きです。WEBサーバーと一緒に使う様なリバースプロキシではありません。
このプロキシサーバーの使い道として、社内ネットワークから外部に出たりする時に利用したり、特定のサーバーにアクセスする時に、このプロキシサーバー経由のみを許可するなど色々な使い道があります。
では、さっそく構築しておきましょう!
Squid(Proxy)をインストール
// インストール
# apt-get install squid
squid.conf 編集
// 編集
# vi /etc/squid/squid.conf

// ~省略~

-auth_param basic program
+auth_param basic program /usr/lib/squid/ncsa_auth /etc/squid/passwd ← 変更:パスワードファイル名を指定する。

// ~省略~

#acl password proxy_auth REQUIRED
acl password proxy_auth REQUIRED ← 変更:認証用acl名を追加する。

// ~省略~

-acl localnet src 192.168.0.0/16 # RFC1918 possible internal network
+acl localnet src 192.168.0.0/24 # RFC1918 possible internal network ← 変更:ローカルネットワークを変更する。

// ~省略~

// http_access allow localhost の下へ記述
http_access allow localhost
+http_access allow password ← 追加:パスワード認証を許可する。

// ~省略~

-http_port 3128
+http_port 8080 ← 変更:デフォルトポートを変更する。

// ~省略~

#  TAG: header_access
#	Usage: header_access header_name allow|deny [!]aclname ...
#
#	WARNING: Doing this VIOLATES the HTTP standard.  Enabling
#	this feature could make you liable for problems which it
#	causes.
#
#	This option replaces the old 'anonymize_headers' and the
#	older 'http_anonymizer' option with something that is much
#	more configurable. This new method creates a list of ACLs
#	for each header, allowing you very fine-tuned header
#	mangling.
#
#	You can only specify known headers for the header name.
#	Other headers are reclassified as 'Other'. You can also
#	refer to all the headers with 'All'.
#
#	For example, to achieve the same behavior as the old
#	'http_anonymizer standard' option, you should use:
#
#		header_access From deny all
#		header_access Referer deny all
#		header_access Server deny all
#		header_access User-Agent deny all
#		header_access WWW-Authenticate deny all
#		header_access Link deny all
#
#	Or, to reproduce the old 'http_anonymizer paranoid' feature
#	you should use:
#
#		header_access Allow allow all
#		header_access Authorization allow all
#		header_access WWW-Authenticate allow all
#		header_access Proxy-Authorization allow all
#		header_access Proxy-Authenticate allow all
#		header_access Cache-Control allow all
#		header_access Content-Encoding allow all
#		header_access Content-Length allow all
#		header_access Content-Type allow all
#		header_access Date allow all
#		header_access Expires allow all
#		header_access Host allow all
#		header_access If-Modified-Since allow all
#		header_access Last-Modified allow all
#		header_access Location allow all
#		header_access Pragma allow all
#		header_access Accept allow all
#		header_access Accept-Charset allow all
#		header_access Accept-Encoding allow all
#		header_access Accept-Language allow all
#		header_access Content-Language allow all
#		header_access Mime-Version allow all
#		header_access Retry-After allow all
#		header_access Title allow all
#		header_access Connection allow all
#		header_access Proxy-Connection allow all
#		header_access All deny all
#
#	By default, all headers are allowed (no anonymizing is
#	performed).
#
#Default:
# none
header_access Referer deny all ← 追加:参照元URLの非表示

// 追加:ユーザーエージェントを非表示。非表示にした場合、アクセス出来ないサイトが増えるのでオフ。
#header_access User-Agent deny all

# 追加:プロクシ経由でアクセスしているのを通知しない。
header_access Via deny all
header_access Cache-Control deny all
header_access X-Forwarded-For deny all
----- 中略 -----
#  TAG: visible_hostname
#	If you want to present a special hostname in error messages, etc,
#	define this.  Otherwise, the return value of gethostname()
#	will be used. If you have multiple caches in a cluster and
#	get errors about IP-forwarding you must set them to have individual
#	names with this setting.
#
#Default:
# none

visible_hostname unknown ← 追加:プロキシサーバーのホスト名を非表示する。
----- 中略 -----
-forwarded_for on
+forwarded_for off ← 変更:接続元IPアドレスを隠蔽する。
----- 下略 -----
パスワードファイルの作成
// 新規作成
# htpasswd -c /etc/squid/passwd user
New password:******* ← パスワードを入力
Re-type new password:******* ← もう一度パスワードを入力
Adding password for user user
再起動(設定反映)
// 再起動
# /etc/init.d/squid restart
ここまででプロキシサーバーの構築は終わりです。
ブラウザーにプロキシサーバーを設定する
ブラウザーのプロキシ設定を開いて下さい。
インターネットのプロパティ → ローカルエリアネットワーク(LAN)の設定 → プロキシサーバー
アドレス:今回、構築したサーバーのIP、またはドメイン
ポート:8080
設定後にブラウザーを開くと、ユーザーとパスワードの入力を求められるので、上記で設定した情報を入力するとプロキシ経由でインターネットに接続できるようになります。
今回、構築したプロキシサーバーがインターネットに出来ない環境の場合、このサーバーを経由してもインターネットには接続できませんのでご注意下さい。^^;