※本ページには広告(アフィリエイトプログラム等)が含まれます。
Nginxでベーシック認証を設定するときは、直接、 /etc/nginx/sites-available/default に設定を書く必要があります。
※ Nginxは 「.htaccess」 が使えません。
1. サイト設定ファイルを修正
21-22行目の2行を追加します。"Auth" は、"My Site" などに置き換えても大丈夫です。
# vi /etc/nginx/sites-available/default を修正します。
下記は既に修正済みです。
# You may add here your
server {
	listen 80;
	server_name example.com;
	rewrite ^/(.*) http://www.example.com/$1 permanent;
}

server {
	listen 80;

	root /home/hoge/example.com/wordpress;
	index index.php index.html index.htm;

	server_name www.example.com;

	access_log /var/log/nginx/example.com-access.log;
	error_log /var/log/nginx/example.com-error.log;

	location / {

		auth_basic "Auth";
		auth_basic_user_file $document_root/.htpasswd;

		rewrite ^/sitemap(-+([a-zA-Z0-9_-]+))?.xml$ "/index.php?xml_sitemap=params=$2" last;
		rewrite ^/sitemap(-+([a-zA-Z0-9_-]+))?.xml.gz$ "/index.php?xml_sitemap=params=$2;zip=true" last;
		rewrite ^/sitemap(-+([a-zA-Z0-9_-]+))?.html$ "/index.php?xml_sitemap=params=$2;html=true" last;
		rewrite ^/sitemap(-+([a-zA-Z0-9_-]+))?.html.gz$ "/index.php?xml_sitemap=params=$2;html=true;zip=true" last;

		if (-f $request_filename) {
			expires 30d;
			break;
		}

		if (!-e $request_filename) {
			rewrite ^.+?($/wp-.*) $1 last;
			rewrite ^.+?(/.*.php)$ $1 last;
			rewrite ^ /index.php last;
		}
	}

	location /wp-admin {
		set $do_not_cache 1;
	}

	set $do_not_cache 1;

	location ~ .php$ {
		fastcgi_pass unix:/var/run/php5-fpm.sock;
		fastcgi_index index.php;
		fastcgi_param SCRIPT_FILENAME $document_root$fastcgi_script_name;
		include fastcgi_params;
		fastcgi_pass_header "X-Accel-Redirect";
		fastcgi_pass_header "X-Accel-Expires";
		fastcgi_no_cache $do_not_cache;
		fastcgi_cache_bypass $do_not_cache;
		fastcgi_cache wpcache;
		fastcgi_cache_key "$scheme://$host$request_uri";
		fastcgi_cache_valid 200 10m;
		fastcgi_cache_valid 404 1m;
	}

	location ~ .(jpg|png|gif|swf|jpeg|ico)$ {
		expires 30d;
	}

	location ~ .(css|js)$ {
		charset UTF-8;
		expires 30d;
	}

	location = /favicon.ico {
		log_not_found off;
		access_log off;
	}

	location = /robots.txt {
		log_not_found off;
		access_log off;
	}

	location ~ /(.ht|.user.ini|.git|.hg|.bzr|.svn) {
		deny  all;
	}

	error_page 500 502 503 504 /50x.html;
	location = /50x.html {
		root /usr/share/nginx/html;
	}
}
今回は、サイト全体がベーシック認証の対象になりますが、
location /wp-admin {の中にベーシック認証の記述を書けば、WordPressの管理画面にベーシック認証を設定することが出来ます。特定のディレクトリだけも可能です。
2. パスワードファイルの作成と設置
Nginxは、パスワードファイルを作成するツールがありませんので、裏技を使ってパスワードファイルを作成します。
// パスワードファイルの作成(ユーザー:hoge パスワード:password)
$ printf "hoge:$(openssl passwd -crypt password)n" >> ~/example.com/.htpasswd
パスワードファイル作成は、WEBサイトでも作成が出来ます。ベーシック認証のパスワード生成ツールで、パスワードファイルを作成してFTPでアップロードしてください。複数のユーザーとパスワードも一度で作れる優れたサイトです。
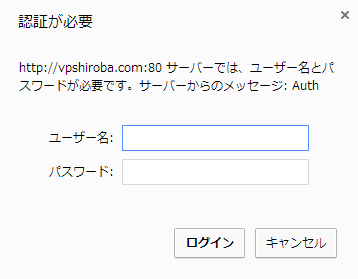
これでベーシック認証の設定は完了です!
サイトにアクセスすると認証画面が出るので、設定したユーザー名とパスワードを入力してログインが出来るか試してくださいね~。