昨年頃からNginxを使ってWordPressを動かしたいとの要望が多くなってきましたので、実際にVPSを借りて初期の段階からWordPressが動くまでの手順を公開します。
なぜ、「Apache + WordPress」の組み合わせでは無く、「Nginx + WordPress」の組み合わせが人気があるのでしょうか?それはNginxの方が多くのアクセスを処理できるからです。私のWEBサイトでは、約15~30倍も多く処理することが出来るようになりました。もちろん、多少のチューニングは必要になりますが初期設定のままでも十分なくらい速いのです。
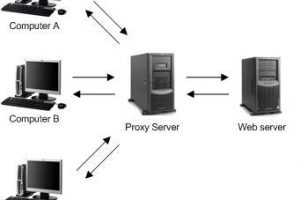
Nginxの特徴として、静的ファイルの配信が最も得意とする分野です。一昔は画像配信などに使われてましたが、最近は、WEB配信をメインに使う企業も多くなりました。
今回、実際に借りたVPSと導入プログラムはこちらです。
GMOクラウドのVPS![]() / マイクロ プラン
/ マイクロ プラン
Debian 6.0 x64(※Debian 7.5 にアップグレードしました。)
導入プログラム
Nginx 1.6
PHP 5.4(php-fpm)
APC(PHPアクセレーター)
MySQL 5.6
WordPress 3.9(最新版)
※ 非公式リポジトリ(Dotdeb)をメインに使います。
※ 設定ファイルは省略しないで記載します!
※ 必要最低限の設定のみで行います!
初めにお読みください
このページを見て頂いている方は、VPSか専用サーバーを使われていると思います。であれば、WordPressを複数構築する可能性もあるものとして、更にメンテナンスしやすい構築方法で作業を進めます。
rootユーザーしかお持ちで無い方は、事前に一般ユーザーを作成して下さい。
// ユーザー作成(-m ホームディレクトリも作成)
# useradd -m -s /bin/bash hoge

// パスワード設定
# passwd hoge
ここからは淡々とrootで作業を進めます・・・。
Nginx 1.6の導入
Debian 7.5は標準で「Nginx 1.2.1」なので、非公式リポジトリを使いインストールします。
// dotdebリポジトリを追加
# add-apt-repository 'deb http://packages.dotdeb.org wheezy all'


// GPGキー追加
# wget -O - http://www.dotdeb.org/dotdeb.gpg | apt-key add -


// パッケージリストを更新
# apt-get clean && apt-get update


// Nginx インストール
# apt-get install nginx
Nginxの設定を行います。
# vi /etc/nginx/nginx.confを修正します。
下記の nginx.conf は既に修正済みです。
user www-data;
worker_processes auto;
pid /var/run/nginx.pid;

events {
	worker_connections 768;
	multi_accept off;
	use epoll;
}

http {

	##
	# Basic Settings
	##

	sendfile on;
	tcp_nopush on;
	tcp_nodelay on;
	keepalive_timeout 65;
	types_hash_max_size 2048;
	server_tokens off;
	client_max_body_size 0;

	limit_conn_zone $binary_remote_addr zone=addr:5m;
	limit_conn addr 100;

	server_names_hash_bucket_size 64;
	server_name_in_redirect off;
	port_in_redirect off;

	include /etc/nginx/mime.types;
	default_type application/octet-stream;

	##
	# Logging Settings
	##

	access_log /var/log/nginx/access.log;
	error_log /var/log/nginx/error.log;

	##
	# Gzip Settings
	##

	gzip on;
	gzip_disable "msie6";

	gzip_vary on;
	gzip_proxied any;
	gzip_comp_level 6;
	gzip_buffers 16 8k;
	gzip_http_version 1.1;
	gzip_types text/plain text/css application/json application/x-javascript text/xml application/xml application/xml+rss text/javascript;
	gzip_static on;

	# fastcgi cache
	fastcgi_cache_path /var/cache/nginx levels=1:2 keys_zone=wpcache:10m max_size=50M inactive=60m;

	##
	# nginx-naxsi config
	##
	# Uncomment it if you installed nginx-naxsi
	##

	#include /etc/nginx/naxsi_core.rules;

	##
	# Virtual Host Configs
	##

	include /etc/nginx/conf.d/*.conf;
	include /etc/nginx/sites-enabled/*;
}


#mail {
#	# See sample authentication script at:
#	# http://wiki.nginx.org/ImapAuthenticateWithApachePhpScript
#
#	# auth_http localhost/auth.php;
#	# pop3_capabilities "TOP" "USER";
#	# imap_capabilities "IMAP4rev1" "UIDPLUS";
#
#	server {
#		listen     localhost:110;
#		protocol   pop3;
#		proxy      on;
#	}
#
#	server {
#		listen     localhost:143;
#		protocol   imap;
#		proxy      on;
#	}
#}
gzip_comp_level 6; - 圧縮レベル設定(1(MAX)-9)1にして圧縮率を上げたくなりますが、あまり効果が無く無駄にCPUを使ってしまう可能性があるので、コンテンツに合せて微調整が必要。
- GIDZipTest(圧縮率が確認出来るサイト)
WordPressを公開するサイト設定を行います。
- http://example.com/ に アクセスがあった場合は、http://www.example.com/ に転送する様に設定済み。
- サイトマッププラグイン(Google XML Sitemaps)の為の記述済み。
- Nginx側のキャッシュは無効にしてあります。
- ※106行目の「set $do_not_cache 1;」→「set $do_not_cache 0;」にするとキャッシュが有効になります。キャッシュを有効にした場合は、WordPressに「Nginx Cache Controller」プラグインを導入してください。
# vi /etc/nginx/sites-available/default を修正します。
下記の default は既に修正済みです。
# You may add here your
server {
	listen 80;
	server_name example.com;
	rewrite ^/(.*) http://www.example.com/\ permanent;
}

server {
	listen 80;

	root /home/hoge/example.com/wordpress;
	index index.php index.html index.htm;

	server_name www.example.com;

	access_log /var/log/nginx/example.com-access.log;
	error_log /var/log/nginx/example.com-error.log;

	location / {
		rewrite ^/sitemap(-+([a-zA-Z0-9_-]+))?\.xml$ "/index.php?xml_sitemap=params=$2" last;
		rewrite ^/sitemap(-+([a-zA-Z0-9_-]+))?\.xml\.gz$ "/index.php?xml_sitemap=params=$2;zip=true" last;
		rewrite ^/sitemap(-+([a-zA-Z0-9_-]+))?\.html$ "/index.php?xml_sitemap=params=$2;html=true" last;
		rewrite ^/sitemap(-+([a-zA-Z0-9_-]+))?\.html.gz$ "/index.php?xml_sitemap=params=$2;html=true;zip=true" last;

		if (-f $request_filename) {
			expires 30d;
			break;
		}

		if (!-e $request_filename) {
			rewrite ^.+?($/wp-.*) $1 last;
			rewrite ^.+?(/.*\.php)$ $1 last;
			rewrite ^ /index.php last;
		}
	}

	location /wp-admin {
		set $do_not_cache 1;
	}

	set $do_not_cache 1;

	location ~ \.php$ {
		fastcgi_pass unix:/var/run/php5-fpm.sock;
		fastcgi_index index.php;
		fastcgi_param SCRIPT_FILENAME $document_root$fastcgi_script_name;
		include fastcgi_params;
		fastcgi_pass_header "X-Accel-Redirect";
		fastcgi_pass_header "X-Accel-Expires";
		fastcgi_no_cache $do_not_cache;
		fastcgi_cache_bypass $do_not_cache;
		fastcgi_cache wpcache;
		fastcgi_cache_key "$scheme://$host$request_uri";
		fastcgi_cache_valid 200 10m;
		fastcgi_cache_valid 404 1m;
	}

	location ~ \.(jpg|png|gif|swf|jpeg|ico)$ {
		expires 30d;
	}

	location ~ \.(css|js)$ {
		charset UTF-8;
		expires 30d;
	}

	location = /favicon.ico {
		log_not_found off;
		access_log off;
	}

	location = /robots.txt {
		log_not_found off;
		access_log off;
	}

	location ~ \.(htaccess|htpasswd|git|svn|sqlite3|sql|tpl|scss) {
		deny  all;
	}

	error_page 500 502 503 504 /50x.html;
	location = /50x.html {
		root /usr/share/nginx/html;
	}
}


# statements for each of your virtual hosts to this file

##
# You should look at the following URL's in order to grasp a solid understanding
# of Nginx configuration files in order to fully unleash the power of Nginx.
# http://wiki.nginx.org/Pitfalls
# http://wiki.nginx.org/QuickStart
# http://wiki.nginx.org/Configuration
#
# Generally, you will want to move this file somewhere, and start with a clean
# file but keep this around for reference. Or just disable in sites-enabled.
#
# Please see /usr/share/doc/nginx-doc/examples/ for more detailed examples.
##

server {
	listen 80 default_server;
	listen [::]:80 default_server ipv6only=on;

	root /usr/share/nginx/html;
	index index.html index.htm;

	# Make site accessible from http://localhost/
	server_name localhost;

	location / {
		# First attempt to serve request as file, then
		# as directory, then fall back to displaying a 404.
		try_files $uri $uri/ =404;
		# Uncomment to enable naxsi on this location
		# include /etc/nginx/naxsi.rules;
	}

	#error_page 404 /404.html;

	# redirect server error pages to the static page /50x.html
	#
	#error_page 500 502 503 504 /50x.html;
	#location = /50x.html {
	#	root /usr/share/nginx/html;
	#}

	# pass the PHP scripts to FastCGI server listening on 127.0.0.1:9000
	#
	#location ~ \.php$ {
	#	fastcgi_split_path_info ^(.+\.php)(/.+)$;
	#	# NOTE: You should have "cgi.fix_pathinfo = 0;" in php.ini
	#
	#	# With php5-cgi alone:
	#	fastcgi_pass 127.0.0.1:9000;
	#	# With php5-fpm:
	#	fastcgi_pass unix:/var/run/php5-fpm.sock;
	#	fastcgi_index index.php;
	#	include fastcgi_params;
	#}

	# deny access to .htaccess files, if Apache's document root
	# concurs with nginx's one
	#
	#location ~ /\.ht {
	#	deny all;
	#}
}


# another virtual host using mix of IP-, name-, and port-based configuration
#
#server {
#	listen 8000;
#	listen somename:8080;
#	server_name somename alias another.alias;
#	root html;
#	index index.html index.htm;
#
#	location / {
#		try_files $uri $uri/ =404;
#	}
#}


# HTTPS server
#
#server {
#	listen 443;
#	server_name localhost;
#
#	root html;
#	index index.html index.htm;
#
#	ssl on;
#	ssl_certificate cert.pem;
#	ssl_certificate_key cert.key;
#
#	ssl_session_timeout 5m;
#
#	ssl_protocols SSLv3 TLSv1 TLSv1.1 TLSv1.2;
#	ssl_ciphers "HIGH:!aNULL:!MD5 or HIGH:!aNULL:!MD5:!3DES";
#	ssl_prefer_server_ciphers on;
#
#	location / {
#		try_files $uri $uri/ =404;
#	}
#}
PHP 5.4(php-fpm)の導入
PHP 5.4 & 必要な物をインストールします。
// PHP 5.4 & 必要な物 インストール
# apt-get install php5 php5-common php5-cli php5-fpm php5-mysqlnd

// あれば使うかも? インストール
# apt-get install php5-gd php5-mcrypt php5-curl php-pear
APC(PHPアクセレーター)の導入
APCを導入するとPHPの中間コードをキャッシュしてパフォーマンスが向上しますのでAPCを導入します。
// APC インストール
# apt-get install php-apc
APCの設定を行います。
3-10行目の設定を追加します。
# vi /etc/php5/mods-available/apc.iniを修正します。
下記の apc.ini は既に修正済みです。
extension=apc.so

[apc]
apc.enabled=1
apc.mode=mmap
apc.cachedir=/tmp
apc.max_file_size=10M
apc.shm_size=256M
apc.check_compiled_source=1
apc.check_mtime=1
Nginxの再起動
設定ファイルを反映する為に、一度再起動。
// Nginx 再起動
# /etc/init.d/nginx restart
※ 今後、設定ファイルを反映するにはリロードを使ってください。(restart → reload)
MySQL 5.6の導入
インストールの途中でMySQL用のrootパスワード入力画面が出ます。お好きなrootパスワードを設定してください。
// MySQL 5.6 インストール
# apt-get install mysql-client-5.6 mysql-server-5.6
MySQLにWordPress用のデータベース&ユーザーを作成します。
// MySQLにログイン
# mysql -uroot -p

// データベース作成
mysql> create database example_com;

// ユーザー作成
mysql> grant all on example_com.* to 'hoge'@'localhost' identified by 'password';

// MySQLを抜ける
mysql> \q
上記の設定
- データベース名
- example_com
- ユーザー名
- hoge
- パスワード
- password
- ホスト名
- localhost
MySQL 5.6の設定は、初期設定のままでも動きますので今回は割愛します。チューニングは別途お調べください。
phpMyAdminを導入すれば、「状態」→「アドバイザ」で、チューニングのポイントを教えてくれます。

WordPress 3.9(最新版)の導入
通常はFTPで公開ディレクトリに展開すれば大丈夫ですが、コマンドだけ導入する方法も記述します。
// 一般ユーザーになる
# su hoge

// ディレクトリ作成
$ mkdir ~/example.com/

// ディレクトリ移動
$ cd ~/example.com/

// WordPressをダウンロード
$ wget http://ja.wordpress.org/wordpress-3.9.1-ja.tar.gz

// 展開
$ tar xzvf wordpress-3.9.1-ja.tar.gz
WordPressの設定ファイルを作成します。
$ vi ~/example.com/wordpress/wp-config.phpを新規作成します。
下記の wp-config.php の内容をご自分の環境に合わせて作成してください。
50-57行目は、秘密鍵サービスのサイトで自動生成できます。
u@=bn5JQ^K{l`');
define('SECURE_AUTH_KEY',  'w~zl]>8sw[09j|d%y-;LH6f+R2Q5|Ykm(f/hvLwkRHdBo6kIR@|&|q-*c`TwSY<a'); define('logged_in_key',="" 'y=")jX" z%n(jwjjj2-;z[nvrjww!ckssq6+cmszja7!a!px_~-m8uk8ev2mw|o&d');="" define('nonce_key',="" 'hjq5(ziq^="" 1lbizn-8et{a`oxzlxxa+a$9gjb7z~fhhc%8(+~$m[3:seirdz@`!d');="" define('auth_salt',="" 'ml="" grbhyn2q#um:="" c1lp5od!`gd-zicqc(8|}="B|21bj~)?;|=#h?rQ@P|Coz+d0');" define('secure_auth_salt',="" '{ds:&c="h|1!BBoNJ.:" ot}iar)r+9$c8x="L0ShOFEuO@RCSy?gG%3wmoHB);Q]Z#');" define('logged_in_salt',="" '|$!~!vuv`i]j737,;+}ux6lb*|;(.cxa<ph8idx[jgc635v<)62swk="" :ni@f-="fz');" define('nonce_salt',="" 'xrqxw}d8*(!lp="">jDdq*9m@mS7kX6]a8|DYrWSL&O>h:B&O
WordPressのパーミッション(アクセス権)を設定します。
// パーミッション設定
$ chmod 0707 ~/example.com/wordpress/wp-content/
$ chmod 0707 ~/example.com/wordpress/wp-content/themes/
$ chmod 0707 ~/example.com/wordpress/wp-content/plugins/
WordPressの公開設定を行います。
上記の作業で設定したドメインにアクセスすれば、WordPressの公開設定画面が表示されると思います。
http://www.example.com/
これでNginxを使ったWordPressで配信が出来るようになったと思います。
長い間、お疲れ様でした!