PXEネットワークインストールは、CD/DVDドライブが付いていない端末にOSをインストールする方法です。対象サーバーはPXE対応しているNICが必要で、DHCP&TFTPをインストールするサーバーも必要です。
※ 注意:これから設置するネットワーク内に他のDHCPがある場合は、無効にしてから作業して下さい。
DHCPをインストール
DHCPはクライアントにローカルIPアドレスを割り振ります。
// インストール
# apt-get install dhcp3-server
基本設定1
// 編集
# vi /etc/default/dhcp3-server

// 内容
# Defaults for dhcp initscript
# sourced by /etc/init.d/dhcp
# installed at /etc/default/dhcp3-server by the maintainer scripts

#
# This is a POSIX shell fragment
#

# On what interfaces should the DHCP server (dhcpd) serve DHCP requests?
#	Separate multiple interfaces with spaces, e.g. "eth0 eth1".
-INTERFACES=""
+INTERFACES="eth0" ← 修正:NICを追加
基本設定2
// 編集
# vi /etc/dhcp3/dhcpd.conf

// 内容
#
# Sample configuration file for ISC dhcpd for Debian
#
# $Id: dhcpd.conf,v 1.1.1.1 2002/05/21 00:07:44 peloy Exp $
#

# The ddns-updates-style parameter controls whether or not the server will
# attempt to do a DNS update when a lease is confirmed. We default to the
# behavior of the version 2 packages ('none', since DHCP v2 didn't
# have support for DDNS.)
ddns-update-style none;

# option definitions common to all supported networks...
#option domain-name "example.org"; ← 修正:コメントアウト
#option domain-name-servers ns1.example.org, ns2.example.org; ← 修正:コメントアウト

default-lease-time 600;
max-lease-time 7200;

# If this DHCP server is the official DHCP server for the local
# network, the authoritative directive should be uncommented.
#authoritative;

# Use this to send dhcp log messages to a different log file (you also
# have to hack syslog.conf to complete the redirection).
log-facility local7;

# No service will be given on this subnet, but declaring it helps the
# DHCP server to understand the network topology.

#subnet 10.152.187.0 netmask 255.255.255.0 {
#}

# This is a very basic subnet declaration.

#subnet 10.254.239.0 netmask 255.255.255.224 {
#  range 10.254.239.10 10.254.239.20;
#  option routers rtr-239-0-1.example.org, rtr-239-0-2.example.org;
#}

# This declaration allows BOOTP clients to get dynamic addresses,
# which we don't really recommend.

#subnet 10.254.239.32 netmask 255.255.255.224 {
#  range dynamic-bootp 10.254.239.40 10.254.239.60;
#  option broadcast-address 10.254.239.31;
#  option routers rtr-239-32-1.example.org;
#}

# A slightly different configuration for an internal subnet.
#subnet 10.5.5.0 netmask 255.255.255.224 {
#  range 10.5.5.26 10.5.5.30;
#  option domain-name-servers ns1.internal.example.org;
#  option domain-name "internal.example.org";
#  option routers 10.5.5.1;
#  option broadcast-address 10.5.5.31;
#  default-lease-time 600;
#  max-lease-time 7200;
#}

# Hosts which require special configuration options can be listed in
# host statements.   If no address is specified, the address will be
# allocated dynamically (if possible), but the host-specific information
# will still come from the host declaration.

#host passacaglia {
#  hardware ethernet 0:0:c0:5d:bd:95;
#  filename "vmunix.passacaglia";
#  server-name "toccata.fugue.com";
#}

# Fixed IP addresses can also be specified for hosts.   These addresses
# should not also be listed as being available for dynamic assignment.
# Hosts for which fixed IP addresses have been specified can boot using
# BOOTP or DHCP.   Hosts for which no fixed address is specified can only
# be booted with DHCP, unless there is an address range on the subnet
# to which a BOOTP client is connected which has the dynamic-bootp flag
# set.
#host fantasia {
#  hardware ethernet 08:00:07:26:c0:a5;
#  fixed-address fantasia.fugue.com;
#}

# You can declare a class of clients and then do address allocation
# based on that.   The example below shows a case where all clients
# in a certain class get addresses on the 10.17.224/24 subnet, and all
# other clients get addresses on the 10.0.29/24 subnet.

#class "foo" {
#  match if substring (option vendor-class-identifier, 0, 4) = "SUNW";
#}

#shared-network 224-29 {
#  subnet 10.17.224.0 netmask 255.255.255.0 {
#    option routers rtr-224.example.org;
#  }
#  subnet 10.0.29.0 netmask 255.255.255.0 {
#    option routers rtr-29.example.org;
#  }
#  pool {
#    allow members of "foo";
#    range 10.17.224.10 10.17.224.250;
#  }
#  pool {
#    deny members of "foo";
#    range 10.0.29.10 10.0.29.230;
#  }
#}

# 追加:ネットワーク環境
subnet 192.168.0.0 netmask 255.255.255.0{
	range 192.168.0.102 192.168.0.110;
	option routers 192.168.0.1;
	option broadcast-address 192.168.0.255;
	option domain-name-servers 8.8.8.8;
}

# 追加:DHCPでIPを割り当てるサーバー1
host ホスト名1{
	filename "/pxelinux.0";
	hardware ethernet 00:21:9B:XX:XX:18;
	fixed-address 192.168.0.102;
}

# 追加:DHCPでIPを割り当てるサーバー2(複数ある場合)
host ホスト名2{
	filename "/pxelinux.0";
	hardware ethernet 00:21:9B:XX:XX:19;
	fixed-address 192.168.0.103;
}
DHCPを再起動(設定反映)
// 再起動
# /etc/init.d/dhcp3-server restart
TFTPをインストール
// インストール
# apt-get install tftpd-hpa tftp inetutils-inetd
netbootファイルを設置
// lenny 32bit
# cd /var/lib/tftpboot
# wget http://ftp.debian.org/debian/dists/lenny/main/installer-i386/current/images/netboot/netboot.tar.gz
# tar xvf netboot.tar.gz

// lenny 64bit
# cd /var/lib/tftpboot
# wget http://ftp.debian.org/debian/dists/lenny/main/installer-amd64/current/images/netboot/netboot.tar.gz
# tar xvf netboot.tar.gz
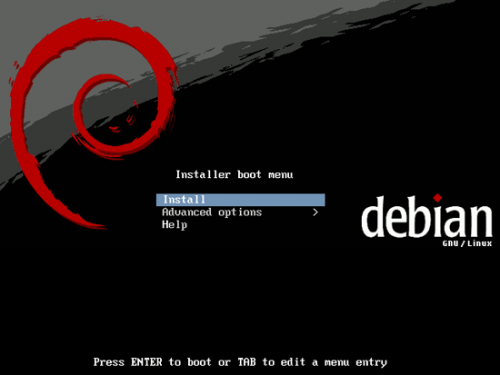
OSインストール手順
- 今回、構築したDHCP兼TFTPサーバー(以下、PXEサーバー)と、これからOSをインストールする端末をLAN接続します。この時、クロスケーブルで直接接続しても構いません。
- PXEサーバーが起動したら、端末を立ち上げPXEから起動する。
(DELL系はF12を押す。) - インストール画面が表示されるので作業を進めていく。
- 追加パッケージのインストールが始まったら、端末をインターネット環境のあるネットワークに接続する。この際、PXEサーバーから割り当てられたIPアドレスがネットワーク内で重複しないように注意する。
- 追加パッケージのインストールが始まったら通常のインストールと同じです。